
 This table was created for a horticulture startup that was having two problems: (1) keeping everyone’s phones charged and also (2) the issue of not having a place for phones to be protected from the controlled elements found in this environment. While listening to the requirements I drew a quick napkin sketch to see how close I was. Not even close; the client ended up drawing what they wanted and in the process made the specification process much simpler. A color scheme and the number of chargers was decided upon.
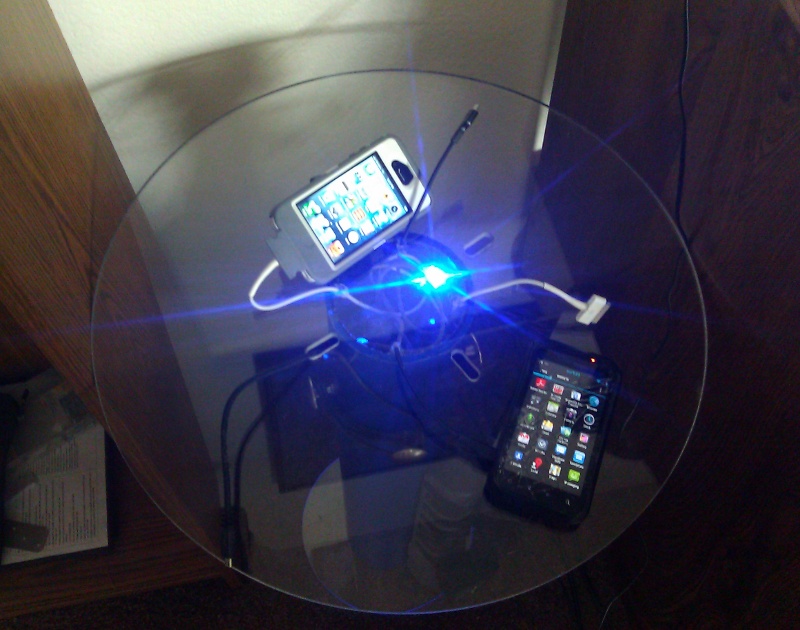
With a rough idea and the concept of it having to be able to handle a not-so-dry environment I set out shopping. A premium surge protector was purchased from Fry’s for its surge protection capabilities, its 15 foot cord, and its stylish feature of being able to rotate the the position of the plugs a full 180-degrees around the front of the surge protector. A trip to Tapp Plastic yielded the top and bottom of the table in pre-cut acrylic. I could have went with polycarbonate for about 30% more plus the cost of cutting it, but opted against it at the time as the cost/time trade-off did not seem worth it. I feel like that was a big mistake as the lines for routing the chargers would have been much cleaner, plus the whole bulletproof thing marketing claim would make these things sell themselves. With the acrylic disc I then headed over to Home Depot where I purchased for a pre-cut length of black pvc tubing and a couple of stainless steel knobs. I then mocked-up the prototype and snapped a few photos which were then approved by the client.
I sanded a smooth plane into the surface of the PVC tube to allow in order the surge protector to mount flush to the pedestal of the table. I then drilled the holes for the inner power distribution source along with the holes for the knobs. The top of the table was then drilled to make the holes for the internal chargers and slots were made to accommodate any additional external chargers. The total number of internal chargers was four; two iphone chargers and two micro SD chargers.
The table was assembled over the course of an all-night session. The bottom of the base was glued in place after a single blue LED was embedded into the plastic to help maximize diffusion. A final layer of plastic glue was applied to the inner surfaces. While I waited for those joints to dry I started on the electronics. After thinking it over I decided to make it as simple as possible. So I went with hooking up a power strip inside the PVC pedestal and then having the chargers plugged into the inner power strip and a wall wart was used to supply power to the three LEDs. The plugs were cut below a level that would be visible from the top and then re-enforced at the phone side of the connector to prevent the the common breakage that occurs with iPhone chargers.
To stabilize the top-heavy table I needed to add weight at the base to prevent uncontrolled tipping. I figured sand would work best, but at 3am procuring sand carn prove to be quite the challenge. I was starving at that point so I ended up going by Adalbertos for a California Burrito and then to a nearby park. The park it turns out was some sort of rubber-based surface. After going to another park, I have never felt more ashamed than at 4:30 in the morning procuring sand from a playground.
With the counterweight in place I tested everything before beginning final assembly. I then tucked all of the components into the pedestal, out of view from the top of the table, and glued the top of the table to the PVC pedestal. Two hours later at 8am I ended up meeting the client for breakfast and the entire team was impressed. It has proved to be quite useful for charging phones and tablets and general swagger to a room.